

Showing posts with label food. Show all posts
Showing posts with label food. Show all posts
Oct 26, 2011
Yummy dish for the hubz...lunch time!
So I prepare this dish quite often because it's so simple to make....here's the dish straight hot and ready to eat. I will be posting the details and recipe soon! Keep posted!

Oct 24, 2011
Fajitas (no oil)
This is simple and you will LOVE it as much as your loved ones will too. Here's what to do:


The next steps I did not photograph because I was doing this dish in a rush for my hubby's lunch so I will elaborate ;-)
Cut up your chicken (nicely cleaned) and sprinkle with salt, light cumin. Also, just spray PAM (or any other healthy alternative non-stick spray) onto your pan. Cook slow on meduim high heat...do not burn the chicken and to prevent this you must pour in water and cover to let it all cook in it's own delicious juices frequently checking and lightly pouring more water if it dries. If your pieces are small enough, your chicken will not take long to cook.
Meanwhile, heat up some torillas on the side. I found some dark corn tortillas and they taste just like the regular ones too!
Once chicken is cooked, not PINK, then add the bell pepper, onion slices and tomatoes. This will exude an enticing and true mexican aroma in your kitchen. Keep cooking lightly...This should just take about 15min now and your ready to serve.


Aug 12, 2011
Crack the egg & a small helping hand
This is the best way to crack an egg and the best magic number to make sure they are always hard-boiled just right? 10 minutes at high heat, that's it and then remove from heat and water that's boiling. The shell is sure to be easily taken off.


Then it was time to bake a cake to take to our Saturday practice for YOung Women and my boy helped each step of the way...luckily, he's scared of the oven so he won't go near it as I cook :-)


My way

I like cereal every now and then, probably not as much as my husband, but I still eat it. I eat it a bit differently. I prefer serving myself in a cup. I used to do it only when I was in a hurry, now I just like doing it this way. Ha, Okay, that was my random thought of the day!
Here are some other things eat for breakfast:
 |
| Toasted sprouted bread in vanilla yogurt with vanilla soymilk...topped with blueberries. My dad's recipe! |
 |
| Gotta have the soy! |
 |
| Andrew's breakfast |
 |
| He loves the egg and one bread slice only...i can wish! |
 |
| Momma's gotta have some salad to help reduce fatty intake in the blood stream! |
Jul 12, 2011
Perfect brown rice

For brown rice:
YOU WILL NEED
1 cup uncooked brown rice
garlic OR minced onions
1 oregano leaf
salt to taste
3 cups water
Extra virgin Olive Oil (EVOO), use canola if you want to cook on high
Pot
MAKE IT
1. Pour in some EVOO to cover the bottom of the pot lightly. Then, pour in the desired amount of rice you'll be cooking. Rice can mutiply in size up to 6 times the uncooked amount. Stir the rice and toast in the oil on medium heat. When cooking with EVOO, never raise the temperature to high. I generally cook 1 cup per meal. You can toast the garlic or onion in this phase too.
2. After the rice is all well toasted and covered in oil, pour in water. Since I cooked one cup rice, I pour in 3 cups water. So if you cook 2 cups rice, then 5 cups of water. 3 cups of rice, then 6 cups of water...and so on. The numbers keep rising: generally 1 part rice, and 2 parts water.
3. Add the salt to taste and the oregano leaf. Do NOT stir, this will make the rice mushy and sticky. You want it to seperate, and stay fluffy on it's own. This is why it's important to let it toast properly.
4. Let it boil and keep an eye on it until all the top grains are fully cooked. Be careful not to let the bottom burn, or else everything will taste burned. This takes lots of practice so don't give up ;-)
Jasmine White rice:
 YOU WILL NEED
1 cup uncooked jasmin rice (or white rice)
garlic OR minced onions
2 table spoons Tomato sauce (optional for color mostly)
1/2 chicken broth tablet
salt to taste
3 cups water
Extra virgin Olive Oil (EVOO), use canola for high heat
Pot
1. Pour in some EVOO to cover the bottom of the pot lightly. Then, pour in the desired amount of rice you'll be cooking. Rice can mutiply in size up to 6 times the uncooked amount. Stir the rice and toast on medium heat and let it get brown, not light brown, actual brown on it's edges. When cooking with EVOO, never raise the temperature to high. I generally cook 1 cup per meal. You can toast the garlic or onion in this phase too in the same pot.
2. After the rice is all well toasted and covered in oil, pour in spoonfuls of tomato sauce and the water. Since I cooked one cup rice, I pour in 3 cups water. Add the chicken broth tablet, raising the amount per water being used. Also, if you cook 2 cups rice, then 5 cups of water, one chicken broth tablet. 3 cups of rice, then 6 cups of water, still one full tablet...and so on. The numbers keep rising: generally 1 part rice, and 2 parts water.
3. Add the salt to taste and the oregano leaf. Do NOT stir, this will make the rice mushy and sticky. You want it to seperate, and stay fluffy on it's own. This is why it's important to let it toast well enough. I also added green beans to this side dish on this day.
4. Let it boil and keep an eye on it until all the top grains are fully cooked. Be careful not to let the bottom burn, or else everything will taste burned. This takes lots of practice so don't give up ;-)
HELPFUL TIPS: If your rice starts to get dry, lower the heat, and add a little bit of water to cover the bottom and save it from burning. You can also just cover this with a lid as it starts to cook from the beginning, making sure it does get sticky.
Jul 11, 2011
Black beans, less-gas style!
My mother always cooked black beans at home and pinto beans too. Through the years, with my dad getting very well acquainted with healthier habits and tricks, he read of a way to cook beans in a way to reduce gassy effects on people. Ever since then, my dear mother has cooked them as such and taught us that same way. This technique can be used for all types of beans to reduce the effect bloating and gas. Remember that beans are a great source of fiber, iron, and protein!

 3. In the morning, or after a minimum of 6 hours, pour out all the water the beans were in. I leave my pot on the cool stove overnight...
 COOL FACT: you'll notice before you pour out the water, that the water is slightly bubbling...it's gas in it, not in the beans anymore! It was all released into the water! Now, get red of that water and do a final quick rinse of the beans.
 4. Fill up the pot and newly-rinsed beans with water again. This time fill up to one third more of the bean's mass and sprinkle in some salt and one garlic tooth....

so if you have 3 cups of beans, then 4 cups water. If you have 6 cups of beans, then 8 cups of water. Get it? I rarely measure, but this is the general rule so I just eyeball it and cook enough for the week.
5. Finally, cover your pot of ready-to-cook beans with the pertaining lid, making sure it seals all around. You want the beans to cook in their own vapors and flavors. If you don't have a lid without holes, you can cover the pot with just enough foil to cover over all edges and then put your lid on. Slow-cook, below medium heat, and check on them every 2 hours or so. They should be ready to eat in another 5-6 hours and super delicious! You can use a clean fork to see how tender they are getting.

TIPS for keeping beans good: As a general rule, beans can get easily contaminated, so always use a clean kitchen utensil to scoop out amounts. Also, they can be cooked ONCE, and then refrigerated up to 7 days safely. Once you re-heat beans, they cannot be stored, they must be consumed because they will go bad if you re-re-heat beans...the gassy quality can return and you can get an upset stomach. Always taste a set of beans before re-heating, they should taste good, not sour.

MASHED BEANS: Just pour the desired amount of refrigerated or just-cooked beans into a blender, add about a 4th of that amount in water and blend on high. If you'll be reheating this to eat, then spray cooking spray or very lightly pour canola oil in a pan or pot to reheat. Stir often and serve.
CANNED BEANS: If you really want canned beans your whole life, you're asking for constant gas. They are sometimes re-fried, which is not good either for you. Remember, beans are very beneficial, but try to make a good habit of eating them fresh and healthy.
 |
| PERFECT! |
YOU WILL NEED
dry beans ready to cook
water
cooking pot, with lid, NO openings!
salt to taste
garlic cloves, one tooth (or powder if you REALLY don't have the real deal)
MAKE IT
1. Prepare the day before you want your beans: pour out the uncooked beans in the pot you'll be using, rinse them and pour out the water.
dry beans ready to cook
water
 |
| NOT THIS! |
salt to taste
garlic cloves, one tooth (or powder if you REALLY don't have the real deal)
MAKE IT
1. Prepare the day before you want your beans: pour out the uncooked beans in the pot you'll be using, rinse them and pour out the water.

2. Fill up the pot with water. Let this sit overnight (or at least 6 hrs) in water, no lid. This process lets the beans release their "gassy" qualities into the water, not absorbing them at all naturally!


so if you have 3 cups of beans, then 4 cups water. If you have 6 cups of beans, then 8 cups of water. Get it? I rarely measure, but this is the general rule so I just eyeball it and cook enough for the week.
5. Finally, cover your pot of ready-to-cook beans with the pertaining lid, making sure it seals all around. You want the beans to cook in their own vapors and flavors. If you don't have a lid without holes, you can cover the pot with just enough foil to cover over all edges and then put your lid on. Slow-cook, below medium heat, and check on them every 2 hours or so. They should be ready to eat in another 5-6 hours and super delicious! You can use a clean fork to see how tender they are getting.

TIPS for keeping beans good: As a general rule, beans can get easily contaminated, so always use a clean kitchen utensil to scoop out amounts. Also, they can be cooked ONCE, and then refrigerated up to 7 days safely. Once you re-heat beans, they cannot be stored, they must be consumed because they will go bad if you re-re-heat beans...the gassy quality can return and you can get an upset stomach. Always taste a set of beans before re-heating, they should taste good, not sour.

MASHED BEANS: Just pour the desired amount of refrigerated or just-cooked beans into a blender, add about a 4th of that amount in water and blend on high. If you'll be reheating this to eat, then spray cooking spray or very lightly pour canola oil in a pan or pot to reheat. Stir often and serve.
CANNED BEANS: If you really want canned beans your whole life, you're asking for constant gas. They are sometimes re-fried, which is not good either for you. Remember, beans are very beneficial, but try to make a good habit of eating them fresh and healthy.
Jun 16, 2011
Canning
http://www.motherearthnews.com/Real-Food/2005-08-01/Learn-to-Can-for-Homegrown-Flavor.aspxWell, as you all may know, it's always a good thing to be prepared. This post is one that I'm going to schedule since I'm trying to take a vacation this week so here it goes, people!
As you may know, or not, I was raised in a home where my mother would daily remind us that "Actions speak louder than words." Til this day, I repeat it as well, and when she would tell us, I would almost cringe! Funny how life is. Well, she also taught us to be self reliant and independent. As one of the many things that she taught is is the art of canning. Yes, it is an art, I believe, because only those that have patience for it will do it. As such, I've been collecting empty glass containers since we moved to our new home and I'm getting ready to start canning in the next few weeks or so so that I can be done by the time snow hits. I know the general rules for this and I'm happy to share it with you all, once I start. As a family, we;ve compiled a home storage for emergencies and continue to grow it despite the financial hardships that come. It is so important to be prepared. I know this because it can help in times when even no one in the house has a job to buy food, to get supplies, and I've witnessed cases in which catastrophes strike and leave food far from reach and being prepared is a blessing which we have to work hard to maintain.
 Here are some general ideas for building a home storage: (all from LDS.ORG)
1. Gradually build a small supply of food that is part of your normal, daily diet until it is sufficient for three months.
2. Store drinking water.
3. Establish a financial reserve by setting aside a little money each week, and gradually increase it to a reasonable amount.
4. Once families have achieved the first three objectives, they are counseled to expand their efforts, as circumstances allow, into a supply of long-term basic foods such as grains, legumes, and other staples.
For now, I've compiled a few websites that will help you along the way and I will share with you great articles about keeping a home storage as well.
Why should you start?:
Home storage for Newly Weds
Home storage for families
How-to:
Learn to Can
Homegrown Canning
One step at a time
Until next time. I'll be online shortly and hopefully ready to hit the ground running! Also, my family might visit the weekend of my boy's birthday!!!!! That's the best news I've had in weeks!!!!
As you may know, or not, I was raised in a home where my mother would daily remind us that "Actions speak louder than words." Til this day, I repeat it as well, and when she would tell us, I would almost cringe! Funny how life is. Well, she also taught us to be self reliant and independent. As one of the many things that she taught is is the art of canning. Yes, it is an art, I believe, because only those that have patience for it will do it. As such, I've been collecting empty glass containers since we moved to our new home and I'm getting ready to start canning in the next few weeks or so so that I can be done by the time snow hits. I know the general rules for this and I'm happy to share it with you all, once I start. As a family, we;ve compiled a home storage for emergencies and continue to grow it despite the financial hardships that come. It is so important to be prepared. I know this because it can help in times when even no one in the house has a job to buy food, to get supplies, and I've witnessed cases in which catastrophes strike and leave food far from reach and being prepared is a blessing which we have to work hard to maintain.
1. Gradually build a small supply of food that is part of your normal, daily diet until it is sufficient for three months.
2. Store drinking water.
3. Establish a financial reserve by setting aside a little money each week, and gradually increase it to a reasonable amount.
4. Once families have achieved the first three objectives, they are counseled to expand their efforts, as circumstances allow, into a supply of long-term basic foods such as grains, legumes, and other staples.
For now, I've compiled a few websites that will help you along the way and I will share with you great articles about keeping a home storage as well.
Why should you start?:
Home storage for Newly Weds
Home storage for families
How-to:
Learn to Can
Homegrown Canning
One step at a time
Until next time. I'll be online shortly and hopefully ready to hit the ground running! Also, my family might visit the weekend of my boy's birthday!!!!! That's the best news I've had in weeks!!!!
Apr 25, 2011
It's not as bad as you think.
Tofu: a great way to get a high-protein punch in your system without eating the fat.
 Many people out there think of tofu as a limiting ingredient and avoid it unless it's in Chinese take-out. Well, I know for a fact that it can be delicious!! Whenever you cook tofu, you have to think of it as a meat and cook it as such. Add what you like to flavor your meat with, or just lightly sautee it too. Whatever you want to do, try it. I know tofu is more expensive than regular meat, but I'd rather spend a few cents extra on a healthy ingredient today than spend hundreds when retirement approaches and I need pills or operations. Weight your options always, pinching and saving is good, but not at the welfare of your health.
I usually just cook my tofu right after I'm done cooking my husband's chicken and use the same seasonings as well. It cooks so fast and, depending on what firmness you bought, it's very versatile. I typically buy the extra firm packs to have more options in suateeing and cutting or lightly stir frying it and plate it as I would prepare a dish with meat. My son loves this too and I feel confident in knowing that his body is receiving doses of protein to help him grow stronger.
Don't be afrais or skeptical, try it! Tratalo!
Apr 12, 2011
Napolitan Flan
This recipe was given to me by my mother and is quite simple. She says it's also common for Latina women to make flan this way. It is called Napolitan Flan because than flan itself uses only 3 ingredients. I for one, LOVE flan!
 YOU WILL NEED
3 eggs
1 can of condensed milk
1 can of evaporated milk
Molasses or Brown Sugar ( I uses the brown sugar because I don't have molasses right now.
Vanilla Extract (optional)
Blender
2 ovenware pans, one small round or small square along with a bigger rectangular one (one needing to FIT inside the bigger one, could be glass or metal for either)
Cooking Spray
MAKE IT
1. Preheat oven to 350 degrees Fahrenheit. In the blender, whip up the eggs, and both cans of milk until the top is frothy. (Optional)You can also add a teaspoon of vanilla while mixing.
2. Spray the smaller ovenware lightly on bottom and all sides and then sprinkle the brown sugar in a light layer OR drizzle Molasses as evenly as possible.
3. Pour in your blended and and whipped mixture of the flan and set this small ovenware inside the empty,non-coated and bigger ovenware. Very gently, fill in the rest of the free space with water from your sink with a cup until your flan lightly floats or is is about to fill up the larger ovenware.
4. This part is tricky: Pick up the water-filled and flan-floating ovenware and place in the middle of your oven rack. Let it cook for 40 minutes to an hour checking every 20 minutes, it all depends of the amount of water used, material, and shape of your pans. The top will become a deep brown, it's ok. This is not going to be seen and the bottom will be...you'll see.
5. Finally, remove your floating flan from the oven with the larger ovenware still underneath. Gently lift the flan off an let it cool for 30 min or more. Make sure it's not hot for the next step.
6. Grab the big sih you'll be serving this from and lay it upside down and on top of the flan still in the small ovenware and while holding it tightly, flip it around to let the flan slide off onto the platter or plate. Now, serve.
 Buen provecho! Enjoy!

3 eggs
1 can of condensed milk
1 can of evaporated milk
Molasses or Brown Sugar ( I uses the brown sugar because I don't have molasses right now.
Vanilla Extract (optional)
Blender
2 ovenware pans, one small round or small square along with a bigger rectangular one (one needing to FIT inside the bigger one, could be glass or metal for either)
Cooking Spray
MAKE IT
1. Preheat oven to 350 degrees Fahrenheit. In the blender, whip up the eggs, and both cans of milk until the top is frothy. (Optional)You can also add a teaspoon of vanilla while mixing.
2. Spray the smaller ovenware lightly on bottom and all sides and then sprinkle the brown sugar in a light layer OR drizzle Molasses as evenly as possible.
3. Pour in your blended and and whipped mixture of the flan and set this small ovenware inside the empty,non-coated and bigger ovenware. Very gently, fill in the rest of the free space with water from your sink with a cup until your flan lightly floats or is is about to fill up the larger ovenware.
4. This part is tricky: Pick up the water-filled and flan-floating ovenware and place in the middle of your oven rack. Let it cook for 40 minutes to an hour checking every 20 minutes, it all depends of the amount of water used, material, and shape of your pans. The top will become a deep brown, it's ok. This is not going to be seen and the bottom will be...you'll see.
5. Finally, remove your floating flan from the oven with the larger ovenware still underneath. Gently lift the flan off an let it cool for 30 min or more. Make sure it's not hot for the next step.
6. Grab the big sih you'll be serving this from and lay it upside down and on top of the flan still in the small ovenware and while holding it tightly, flip it around to let the flan slide off onto the platter or plate. Now, serve.

Mar 5, 2011
Mexican Enchiladas with homemade sauce.
I thought I had posted this recipe when I looked through my pictures to clear out space on my computer, but I haven't so here goes!

STORY TIME! So, there I was going out for a jog in the streets when....nah, nothing like that, but more about food and why I know what I know. I can cook many traditional and typical Mexican and Salvadorian foods like pupusas, enchiladas, chillaquiles, gorditas, pan con chumpe, platanos fritos, etc. My mother taught me everything, unless otherwise noted, starting at the age of 12. I spent a lot of time before dinner mostly in the kitchen before I went to college for years. She knows how to cook Mexican because of her mother and knows Salvadorian dishes because of my father's older relatives and some friends. Well, I was the eldest of eight kids growing up and I sometimes altered the recipes to make things more convenient, cut down on time, and just because I was lazy. Now, I appreciate the flavors and richness that cooking from scratch brings. There is no comparison! Most of all, nothing compares to a meal you make at the heart of your home, not even a $50 plate...believe me, you can make everything yourself that you can buy from a restaurant and still keep the rest in your pocket or just make a feast from scratch out of $50 dollars.
Now, the enchiladas. note that the sauce itself takes about 2 hours. It's so worth it!
 YOU WILL NEED
Chicken, cooked and hand shredded
Tortillas
Mozzarella Cheese
Cheddar Cheese (traditionally Monterrey Cheese is used, but that's a little more fat)
Onion, diced very smallGreen pepper, sliced long, but short enough to fit in a tortilla
 Cilantro
FOR THE SAUCE
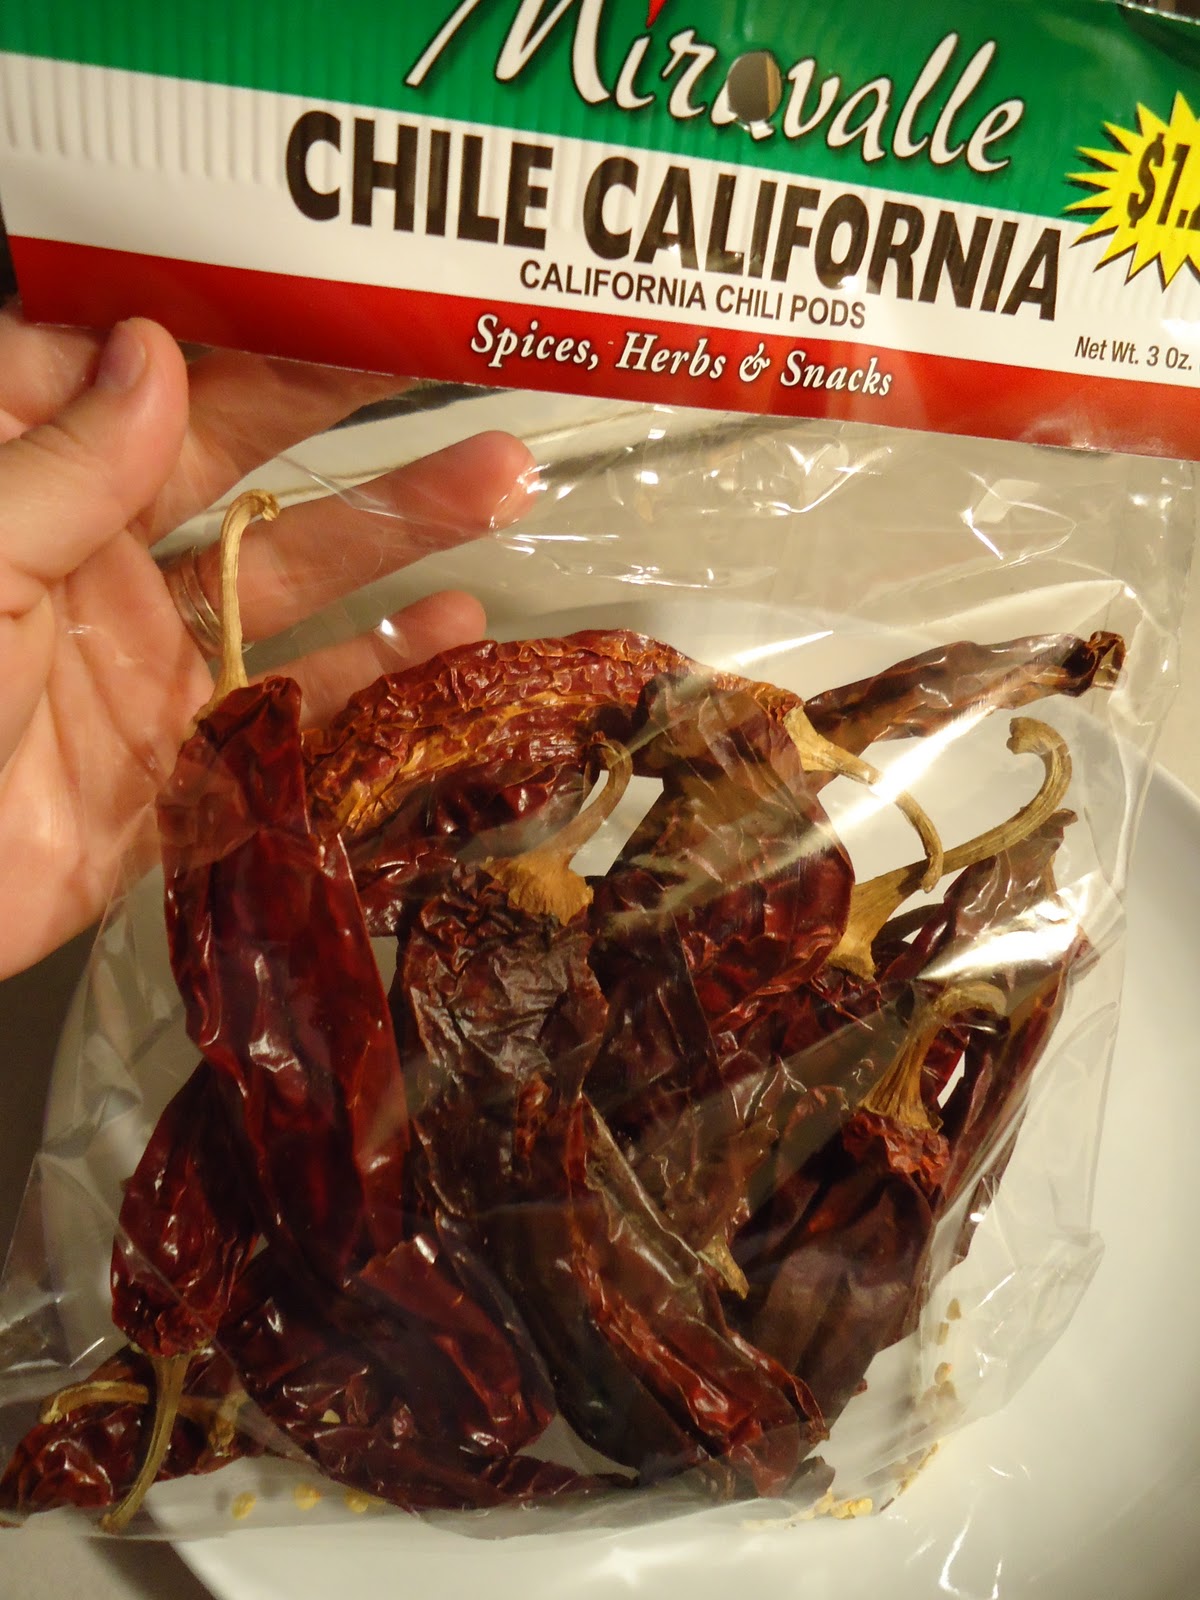
2 tomatoes2 California Chillies, dried and cleaned out from the seeds(I don't like spicy food because it makes my stomach super upset)
1 big garlic clove
1 big garlic clove
salt
Corn starch, about 1/2 tablespoon3 cups water
Blender (preferably plastic, but a if you have a glass one then place it near or on top of the stove while you cook)
MAKE IT

1. Start with the sauce. Boil 2 cups water and clean out the chilies. No seeds! Cut them open vertically and rinse under warm water. Now place in already boiling water for about 20 min.
 2. Remove the boiled Chile and water from heat and let cool to a warm temperature. In a blender(preferably plastic), place halved tomatoes (2 whole), one garlic clove, 1 teaspoon salt, and pour in the boiled chili and water (if the blender is glass, it might crack [it happened to me!]unless you placed it near the stove while it was on). Finally, add about 1/2 tablespoon of corn starch and blend until chili chucks are no longer visible and everything has blended thoroughly well.
 3. Boil this sauce on medium for 90 minutes(1hr & 1/2), stir occasionally to prevent bottom of sauce sticking to pot and cooking evenly everywhere. Don't raise heat to speed up process because it will bubble and make a stingily mess. Check after time is up and if you want to still have a better flavor, then continue cooking for another 30 min. If not, turn off heat and let it sit while you prepare the rest. It will start to thinken quickly. Now, spray the rectangular ovenware with cooking spray, lightly.

4. Warm up your tortillas in the microwave or toaster oven to prevent cracked, rolled enchiladas and to wrap better. Slice long pieces of cheese. Place the green pepper, onions, and shredded chicken horizontally close to the edge and roll, not tightly, but smugly.


5. Place the tortilla inside the ovenware with the open flap face down. This will keep your contents inside while you repeat filling in the tortillas until you finish filling your ovenware.
 |
| A few tortillas cracked bc I left them waiting too long to be rolled. |
6. Now, check that your sauce isn't too thick yet because you need to pour it evenly over the tortillas. It needs to completely soaked so coat every inch of the rolled tortillas, otherwise it's just not an authentic dish and your flavors won't be encompassing every bite. It's good to have a thin layer of this sauce drip down into the pan too to cover both sides of this delicious dish.

7. Usually I shred cheese on top, but I cut out too much cheese up so I placed then on top each enchilada. Now, lightly toss some cilantro on top of everything.

8. Cover with aluminum foil and place in a 350 degree oven for 20 min. Just enough for everything to soak up the flavors of your super tasty enchilada sauce.
 |
| This set of enchiladas are from the day after...my hubby took original enchiladas out quick when he heard the bell and devoured them...fast! So, the sauce here was thick from being in the fridge overnight and I guess I didn't heat it up enough to make it pourable. |
9. Now remove and use a spatula to serve to individuals. There will be sauce in your pot still, but store it in a airtight container for next time, or use it for Chilaquilles, or Pizadillas...yummy! Watch out for spills because this sauce can really stain, like spaghetti sauce.
You can serve this with a side of beans, or rice, or both. Hugo (my starving husband) just eats them by themselves...up to 8...in one sitting. I recommend eating less than that though ;-) Taste your masterpiece!
Buen provecho! Enjoy this real Mexican dish!
Subscribe to:
Posts (Atom)
LinkWithin
