This is so functional and decorative. I think I saw something similar to it when I was preganant in a magazine, but it was more like a wallet you can tuck away in your kitchen drawers...I like this better! I will give a step by step tutorial so you can have one too.
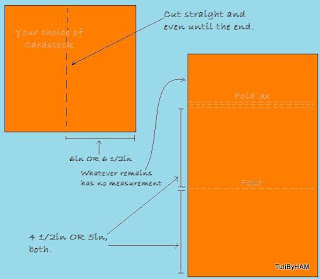
- Get some cute, patterned or decorated cardstock and cut what you need just staright accross from the whole page that is sold in a big square shape. Fold into 3 parts, making the top-most fold thrice closely together since if you make only one fold, it might tear from too much usage after your start to wear it.
- Measure another solid-colored cardstock and cut. Fold as many times as you need, like a fan. So if you want it to have 3 dividing sections, fold vertically 8 times. If you just need 2 compartments, fold 5 times vertically.
- Follow my sketch for where to glue it.Use tacky glue (preferably) to join the fan-like paper to your envelope-like paper and hold to make sure it's sturdy. Slide in more cardstock (or cereal box pieces) that you cut into the right size for your dividers. I used an extra cardstock piece that fit in perfectly.
- Now, decide how you want to keep the flap closed. My mom used velcro, strengthened by more cardstock behind it to be sturdy. I used those metal paper things and also folded the top section my ribbon around it and folded extra from the flap to cover my not inside.
- Decorate! Put on stickers, flowers, gems, or leave it simple if your cardstock is pretty ornate already, or you love the pattern. Here, you just get creative!
- Attach a magnet to the center back a little less than an inch away from the top with a glue gun.
- Now get some coupons and organize them however you want. I divide them into 3 coupon categories: Grocery, restaurant, and products and slide then into their respective section.
Hasta la proxima vez! Until next time!


No comments:
Post a Comment